
Step-by-Step No Power Issue in Sony KDL-40W600B
The Sony KDL-40W600B No Power Fault Guide provides a complete step-by-step solution for this TV’s no power issue. In this article, we will clearly explain the adapter, power supply, and various voltage test points with pictures, so every step is easy to understand. Whether you are a technician or a general user, you will get practical tips at each stage, along with real-world solutions from Sony LED TV Repair Center Lahore. This guide will give you full confidence to troubleshoot the TV’s power problem, making it a comprehensive and actionable resource.
When a Sony KDL-40W600B shows a no power issue, the first step is to check the STBY 3.3V line, particularly at L9107. If the standby voltage is not present (NG), the adapter may need replacement. Next, verify the connection between the LD board and B board harness; if the harness is faulty, replace it. If the harness is OK but the issue persists, check the LD board itself—replace it if necessary. For certain models (HT, HM), changing the LD board resolves the problem, while for HE models, the panel on the B board may need replacement. Also, always check the DC/DC converter and the Ayu2 control section for proper operation. Following these steps ensures a thorough step-by-step approach to fix the no power issue effectively.
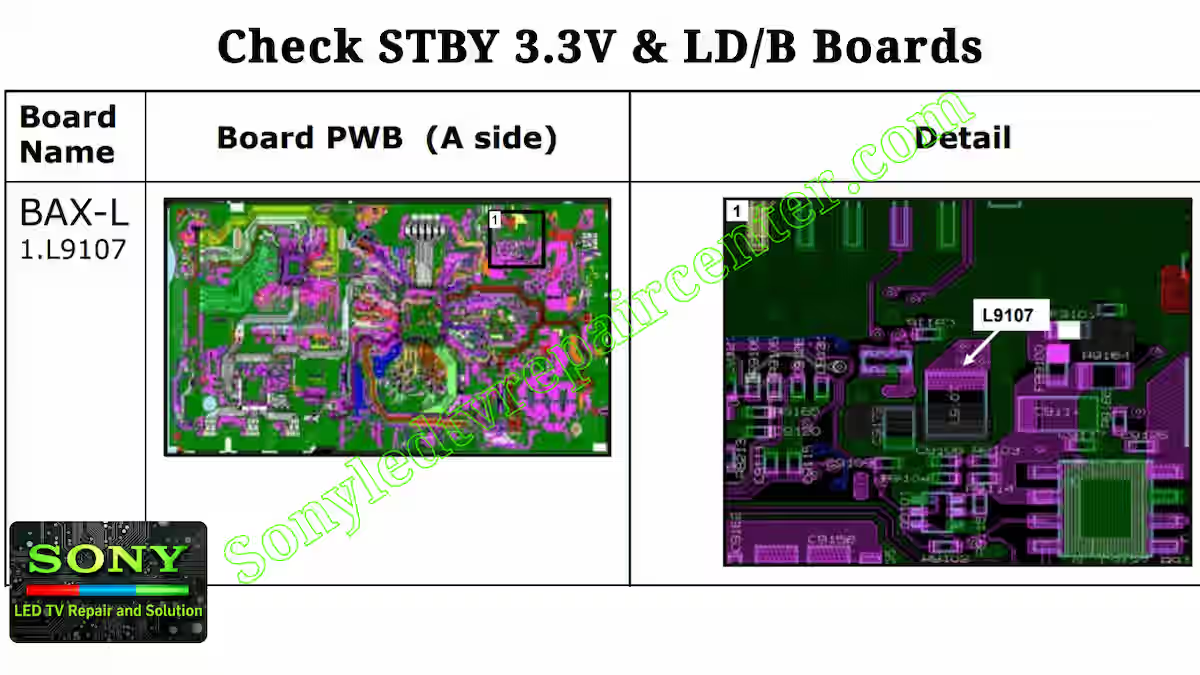
Check STBY 3.3V & LD/B Boards
When a Sony KDL-40W600B shows a no power issue, the first step is to check the STBY 3.3V line at L9107. If the voltage is not present (NG), the adapter may need replacement. Next, inspect the harness between the LD board and B board; if the harness is OK but the issue persists, check the LD board itself—replace it if necessary. For certain models (HT, HM), changing the LD board can resolve the problem, while for HE models, the panel on the B board may need replacement. Always verify the DC/DC converter and the Ayu2 control section to ensure proper operation. Following these steps provides a thorough, step-by-step approach to fix the no power issue. Below, test points are provided to help guide you, along with pictures that clearly illustrate each step.
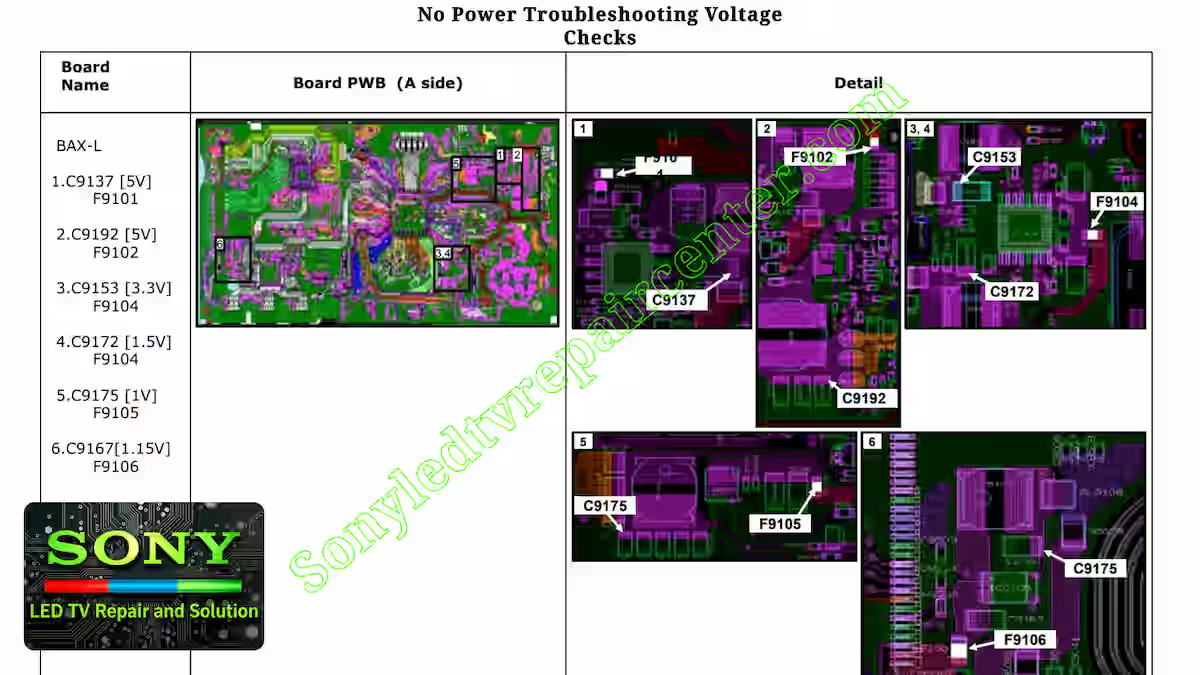
No Power Troubleshooting Voltage Checks
In the Sony KDL-40W600B No Power Fault Guide, the first step is to check all key voltage points to pinpoint where the power failure occurs. Start with C9137, then inspect F9101 if the voltage is abnormal. Next, verify C9175 for 1.0V and F9105 for 5V. Continue by checking C9192 and F9102 for proper 5V levels. After that, measure C9167 for 1.15V and F9106, followed by C9153 for 3.3V and F9104, ensuring each voltage is within specification. This step-by-step sequence allows you to systematically isolate any faulty components and understand the flow of power through the circuit. Below, we have provided a complete picture of all these test points, which will help you visually follow each step and make troubleshooting much easier, giving a clear guide on where the issue may lie.
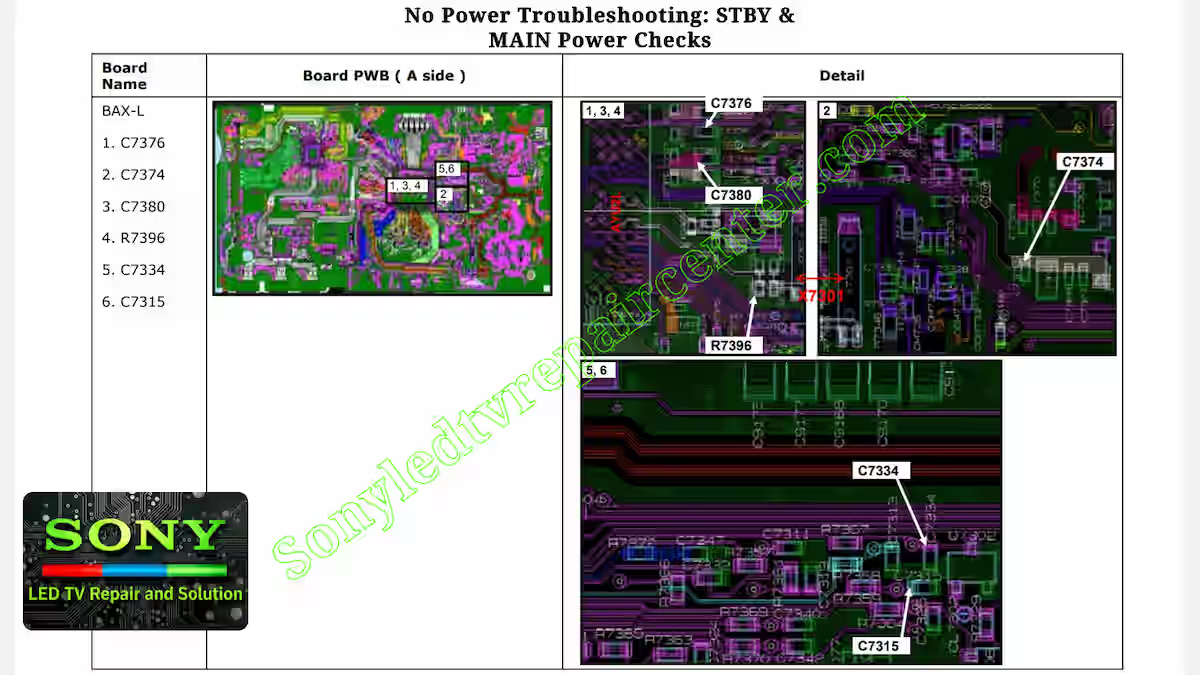
No Power Troubleshooting STBY & MAIN Power Checks
In the Sony KDL-40W600B No Power Fault Guide , the AYU2L is a key control IC responsible for managing standby voltages, power sequencing, and communication between the adapter, G-board, and main power circuitry. To start troubleshooting, check the STBY +3.3V at AYU2L (H15, H16, H17 pins → C7376) and observe the AC_MON line at CN9101 pin12 / C9131, which indicates adapter or G-board failure if voltage is absent (NG). If STBY +3.3V is OK, look for MAIN_POWER line at CN9101 pin11 or consider replacing AYU2. Next, verify MAIN_PWR NG at AYU2 (C13 → C7315), and check STBY +1.8V at AYU2L (H19 → C7374) to identify any standby voltage issues. Continue by checking STBY +1.0V at AYU2L (J15, J16, J17 → C7380), +19.5V from Adapter, and +12V from G-board at CN9101 pin21. Also, verify Xtal oscillation at X7301, 32.768kHz (A23, B23 pins), which if abnormal, may require replacing X7301 or AYU2L. Finally, check the STBY LED blinking as an indicator of power status.
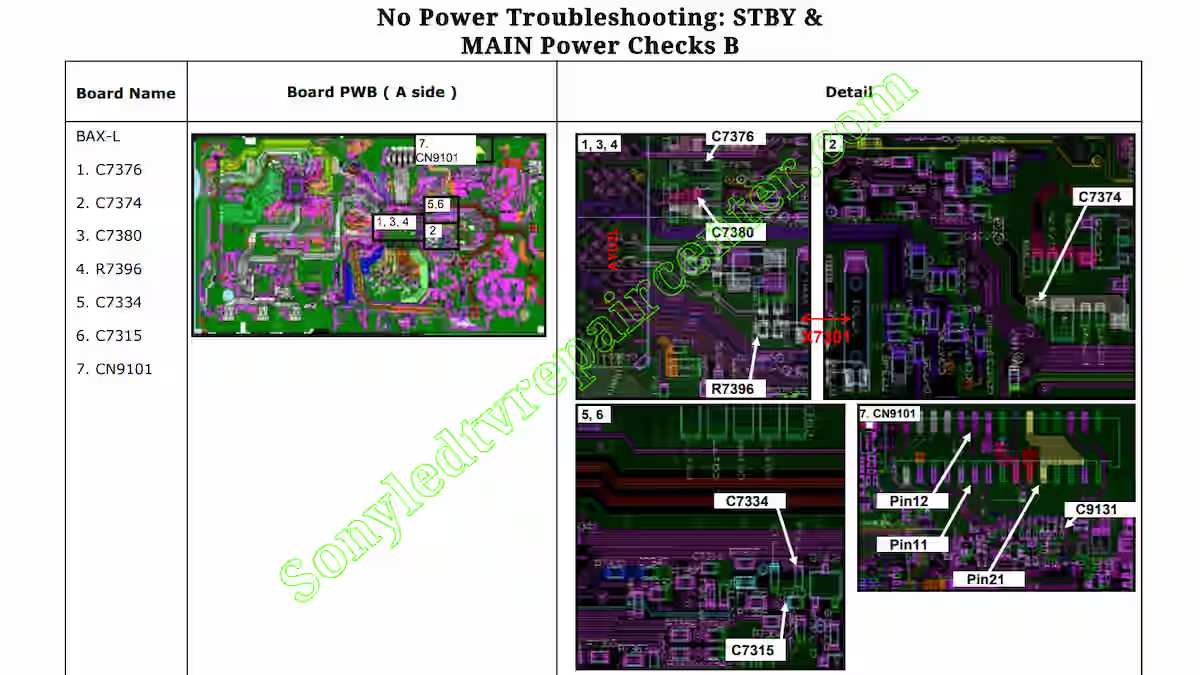
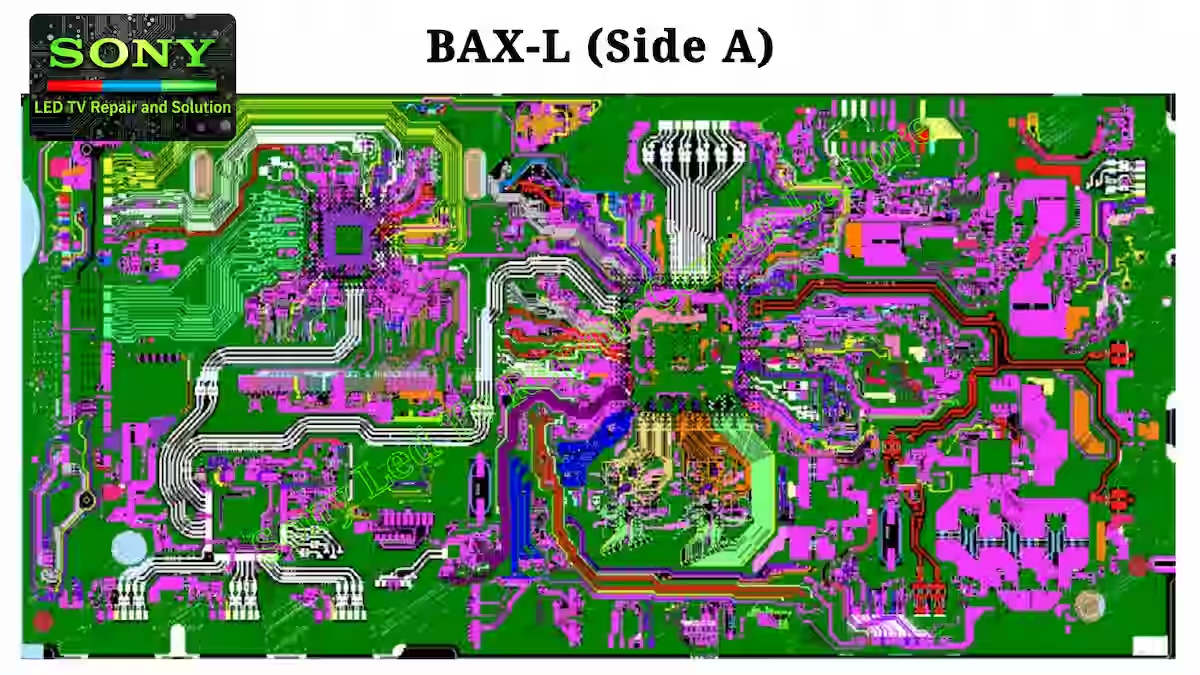
BAXL Board Back Side Layout
The BAXL board, also commonly referred to as the LD board, is a critical part of the Sony KDL-40W600B TV, handling power distribution, signal processing, and connections to other main boards. Below is the complete back side layout of the BAXL/LD board, showing all key components, test points, and connectors in detail. This layout provides technicians and repair professionals a clear view of where each capacitor, resistor, and connector is located, making troubleshooting more accurate and efficient. By studying this image carefully, you can quickly identify critical sections such as power supply paths, signal traces, and communication lines between boards. Understanding the BAXL/LD board layout before starting repairs ensures that any diagnostics, voltage checks, or component replacements are performed correctly. The image below visually represents the back side of the board, giving a full reference that helps both experienced technicians and general repair enthusiasts navigate the board with confidence.
AYU2/AYU2L Failure & Software Rewrite
When a Sony KDL-40W600B shows a no power issue suspected to be due to AYU2/AYU2L failure, the first step is to examine the software and memory components. Start by checking the eMMC / RawNAND for errors and attempt a product software rewrite. If the software rewrite runs successfully, the issue may be resolved. However, if error messages appear during rewriting, it indicates a problem with the memory storage or software data. In this case, analyze the AYU2/L logs to identify which device—either eMMC, RawNAND, or DDR—is causing the failure. This initial step ensures that we can separate software-related issues from hardware failures, giving a clear path forward for troubleshooting.
DDR & eMMC/RawNAND Interface Checks
Next, verify the DDR interface and its communication with eMMC/Raw NAND using software tools like Check SW. If the DDR device fails, the AYU2/L IC or the entire board may need replacement. For eMMC / RawNAND, focus on the environment area, as data failures in this section can prevent the system from running correctly. In such cases, erasing the corrupted eMMC / RawNAND data and rewriting the product software is required. Every step should be carefully observed for error messages, which help pinpoint the exact location of failure and determine whether the device itself or its interface is causing the problem.
Memory Erase, Logs & Final Replacement
Finally, if the software rewrite and memory erasure still do not restore power, the last option is to replace the eMMC / RawNAND or the AYU2/L IC. Store software logs to analyze abnormal behaviors or exceptions during the process, which can provide insights into recurring failures or persistent issues. This step-by-step approach ensures that every potential cause—whether software corruption, memory failure, or AYU2/L malfunction—is methodically checked and resolved. By following this detailed process, technicians can accurately identify and fix AYU2/AYU2L related no power issues in the Sony KDL-40W600B.
Related Article
For a complete understanding of all blinking codes on the Sony KDL-40W600B, check out our article “Sony KDL-40W600B ALL BLINK CODES DETAILS” Sony KDL-60W600B All Blink Codes Details. This guide explains every L blinking code in detail, showing which components are affected and providing step-by-step troubleshooting instructions. It’s an essential reference for technicians and repair enthusiasts who want to accurately diagnose and fix any blinking code issues on this model.
Conclusion
In conclusion, this Sony KDL-40W600B No Power Fault Guide provides a complete step-by-step approach to identify and resolve standby and main power issues, AYU2/AYU2L failures, memory and software-related problems, and board-level faults. By following the detailed checks for voltages, interfaces, and components such as the BAXL/LD board, eMMC/RawNAND, DDR, and associated circuits, technicians can efficiently diagnose the root cause of no power conditions. This guide, brought to you by Sony LED TV Repair Center Lahore, combines practical experience with clear instructions, making it an essential reference for both professional technicians and repair enthusiasts aiming to restore Sony KDL-40W600B TVs to full functionality.
Sony Bravia 3.3V Power Supply Fault Guide
Sony KLV-40W652D 3 Blink Error Fix Guide
Sony Bravia 6 Blink Error Solution

Shaukat Ali has over 30 years of experience in LED TV repair, specializing in chip-level repair work. He is an expert in Sony LED TVs, and also repairs other major brands like Samsung, TCL, Orient, and Haier. His expertise includes display panel faults, motherboard issues, power supply circuits, T-Con, and HDMI faults. Based in Lahore, he shares real-time fault finding cases from daily repair work to help technicians and learners with practical experience.
📞 Contact: +92 321 4066054